Do you know Dagger2?

概述

很多Android Apps通常依赖于其他依赖库的实例化对象, 举例来说, 一个Twitter客户端可能使用类似Retrofit的网络依赖库来进行构建, 要使用这个库, 你需要添加解析的库,比如说Gson. 此外, 那些实现认证或者缓存的类可能需要访问shared preferences和其他公共的存储单元,需要首先实例化他们并且创建固有的依赖链.

Dagger2 为你分析这些依赖库, 并且生成代码以帮助把他们连接在一起, 虽然还有其他的Java 依赖注入库, 但是他们的大多数在依赖XML的时候有很多限制, 在运行期间需要验证依赖关系的问题, 或者在启动期间导致性能上的损耗, Dagger 2纯粹依赖于使用Java注释处理器和编译时检查来分析和验证依赖性. 它被认为是迄今为止效率最高的依赖注入框架之一.

优点

这里有使用Dagger2 的一些优点

  • 简化对共享实例的访问. 举例来说, 正如ButterKnife声明对View, 事件处理, 资源的引用更为简单那种, Dagger2为获取共享实例的饮用提供了一种简单的方式. 比如,一旦我们在Dagger中声明类似MyTwitterApiClient或者SharedPreferences的单例的引用, 我们可以简单的使用 @Inject注解来声明字段
1
2
3
4
5
6
7
8
public class MainActivity extends Activity {
@Inject MyTwitterApiClient mTwitterApiClient;
@Inject SharedPreferences sharedPreferences;
public void onCreate(Bundle savedInstance) {
// assign singleton instances to fields
InjectorClass.inject(this);
}
  • 更容易配制复杂的依赖. 那些你经常创建的对象有一个隐式的过程. Dagger2 遍历依赖图表并且生成以便于理解且追踪代码, 同时把你从编写大量的模版代码的工作中解救出来, 你正常的需要手工编写代码以获取引用并将他们作为依赖传递给其他对象. 它也有助于简化重构, 因为以可以专注于构建哪些模块而不是关注于他们被创建的顺序.

  • 单元和集成变得更为轻松. 因为依赖图表是由我们自己创建的, 我们能够简单的切换模块,作出网络响应并且模拟这种行为

  • 实例作用域. 你不仅更为简单的管理整个应用程序的生命周期, 你还可以利用Dagger2 声明更为简短的生命周期的实例(比如, 绑定用户的seesion, Activity 的生命周期, etc.).

设置

Android studio通常情况下不会允许你连接到生成Dagger2的代码作为合法的类, 因为他们通常情况下不会添加到资源路径, 但是通过添加android-apt 插件能够添加这些文件到IDE路径,并且使你对这些文件有更多的可见性

由于Android Gradle plugin 2.2注释处理是内置的, android-apt并不被受待见. android-apt不支持新的 jack

在你的app/build.gradle 文件中添加以下3行的申请说明

1
2
3
4
5
6
dependencies {
// apt command comes from the android-apt plugin
apt 'com.google.dagger:dagger-compiler:2.8'
compile 'com.google.dagger:dagger:2.8'
provided 'javax.annotation:jsr250-api:1.0'
}

如果你正在使用android gradle 2.3 插件, 你可以使用annotationProcessor 来代替apt-plugin:

1
2
3
4
5
6
dependencies {
// apt command comes from the android-apt plugin
compile "com.google.dagger:dagger:2.9"
annotationProcessor "com.google.dagger:dagger-compiler:2.9"
provided 'javax.annotation:jsr250-api:1.0'
}

要注意的是provided关键字仅仅在编译期间被用来作为依赖关系, Dagger生成用于创建源代码中定义的类的依赖图的代码. 这些类在编译期间被添加到IDE类路径中. annotationProcessor关键字被Android gradle插件所识别并且不会把这些类他们添加到类路径中, 它们仅仅被用来注释处理, 以防止别人意外的引用他们.

创建单例

Creatint singletons

很简单的例子表明如何使用Dagger2 集中你所有创建的单例.
类似于下面这样, 假设在你的Twitter客户端中你从没有使用过任何类型的的依赖注入框架写代码

1
2
3
4
5
6
7
8
9
10
11
12
13
14
15
16
17
18
19
20
OkHttpClient client = new OkHttpClient();
// Enable caching for OkHttp
int cacheSize = 10 * 1024 * 1024; // 10 MiB
Cache cache = new Cache(getApplication().getCacheDir(), cacheSize);
client.setCache(cache);
// Used for caching authentication tokens
SharedPreferences sharedPrefeences = PreferenceManager.getDefaultSharedPreferences(this);
// Instantiate Gson
Gson gson = new GsonBuilder().create();
GsonConverterFactory converterFactory = GsonConverterFactory.create(gson);
// Build Retrofit
Retrofit retrofit = new Retrofit.Builder()
.baseUrl("https://api.github.com")
.addConverterFactory(converterFactory)
.client(client) // custom client
.build();

声明你的单例

你需要通过创建一个Dagger2 moudle来明确哪些对象应该被包含作为依赖链的一部分. 举例来说, 如果我们希望使一个单独的Retrofit单例绑定到整个应用程序的生命周期, 并且对我们所有的activity和fragment都是可用的, 我们首先要让Dagger 知道可以提供一个Retrofit单例

因为我们希望设置caching, 我们需要一份Application Context上下文环境. 我们的第一个Dagger模块AppModule.java将被用来提供此引用, 我们还需要声明带有@Provides注解的方法来告诉Dagger这个方法是返回类型为Application的构造器:

1
2
3
4
5
6
7
8
9
10
11
12
13
14
15
@Module
public class AppModule {
Application mApplication;
public AppModule(Application application) {
mApplication = application;
}
@Provides
@Singleton
Application providesApplication() {
return mApplication;
}
}

我们创建一个名为NetModule.java并且使用@Module标注的类来告诉Dagger在可用方法的范围内寻找来作为实例的提供者

@Singleton注解同样告诉Dagger编译器这个实例在整个应用生命周期中应该仅仅被创建一次, 在以下的例子中, 我们指定SharedPreferences Gson Cache OkHttpClient Retrofit 作为可以用作依赖列表一部分的返回类型

1
2
3
4
5
6
7
8
9
10
11
12
13
14
15
16
17
18
19
20
21
22
23
24
25
26
27
28
29
30
31
32
33
34
35
36
37
38
39
40
41
42
43
44
45
46
47
48
49
50
51
52
53
@Module
public class NetModule {
String mBaseUrl;
// Constructor needs one parameter to instantiate.
public NetModule(String baseUrl) {
this.mBaseUrl = baseUrl;
}
// Dagger will only look for methods annotated with @Provides
@Provides
@Singleton
// Application reference must come from AppModule.class
SharedPreferences providesSharedPreferences(Application application) {
return PreferenceManager.getDefaultSharedPreferences(application);
}
@Provides
@Singleton
Cache provideOkHttpCache(Application application) {
int cacheSize = 10 * 1024 * 1024; // 10 MiB
Cache cache = new Cache(application.getCacheDir(), cacheSize);
return cache;
}
@Provides
@Singleton
Gson provideGson() {
GsonBuilder gsonBuilder = new GsonBuilder();
gsonBuilder.setFieldNamingPolicy(FieldNamingPolicy.LOWER_CASE_WITH_UNDERSCORES);
return gsonBuilder.create();
}
@Provides
@Singleton
OkHttpClient provideOkHttpClient(Cache cache) {
OkHttpClient client = new OkHttpClient();
client.setCache(cache);
return client;
}
@Provides
@Singleton
Retrofit provideRetrofit(Gson gson, OkHttpClient okHttpClient) {
Retrofit retrofit = new Retrofit.Builder()
.addConverterFactory(GsonConverterFactory.create(gson))
.baseUrl(mBaseUrl)
.client(okHttpClient)
.build();
return retrofit;
}
}

注意这个方法名 (i.e. provideGson(), provideRetrofit(), etc)可以起任何名. 使用@Provides注解的返回值类型被用来将此实例与其他任何相同类型的moudle相关联, @Singleton注解被用来像Dagger描述在整个应用程序生命周期期间仅仅初始化一次

Retrofit的实例的同时依赖于GsonOkHttpClient实例, 所以我们可以在同一个类中声明另外一个方法以获取这两个类型. 在这个方法中@Provides注解和这两个参数将会使得Dagger 意识到这里有GsonOkHttpClient的依赖以创建Retrofit的实例

声明注入目标

Dagger为你的activitys, services, 或fragments提供了一种简单的通过使用@Inject注解注入字段并且调用inject()方法来分配引用, 调用inject()方法将会使Dagger2 在依赖图谱中尝试寻找一个相匹配的返回类型来定位单例. 如果找到, 它将分配各自对应字段的引用. 比如, 在下面的例子中, 它会尝试寻找返回类型为MyTwitterApiClientSharedPreferences的提供器(provider)

1
2
3
4
5
6
7
8
public class MainActivity extends Activity {
@Inject MyTwitterApiClient mTwitterApiClient;
@Inject SharedPreferences sharedPreferences;
public void onCreate(Bundle savedInstance) {
// assign singleton instances to fields
InjectorClass.inject(this);
}

Dagger2 中使用的注入器类被称为 component组件, 它为我们的activitys, services, 或则fragments分配引用以连接我们之前声明的单例, 我们同样需要一个@Component注解声明的类, 可以添加的activitys, services, 或则fragments应该在这个类中单独的使用inject()方法声明:

1
2
3
4
5
6
7
@Singleton
@Component(modules={AppModule.class, NetModule.class})
public interface NetComponent {
void inject(MainActivity activity);
// void inject(MyFragment fragment);
// void inject(MyService service);
}

注意这些类并不足以作为注入的目标, Dagger2 依赖相匹配的类, 你必须明确指明那个类应该被声明在内, (这里有一些建议来解决这个问题, 但是这样做代码可能追踪更加困难相比简单的定义它们 )

代码生成

一件重要Dagger2的方面是, 这个库为标注了@Component的接口类生成代码, 你可以使用前缀为@Dagger(i.e. DaggerTwitterApiComponent.java)的类, 它将负责实例化我们的依赖图谱中的一个实例, 并且用它执行@Inject注解字段的注入工作. 请看(setup guide)[https://github.com/codepath/android_guides/wiki/Dependency-Injection-with-Dagger-2#setup].

实例化组件

我们应该在Application的类中做所有工作, 因为这些实例在整个应用程序的生命周期中仅仅被声明一次

1
2
3
4
5
6
7
8
9
10
11
12
13
14
15
16
17
18
19
20
21
22
23
24
public class MyApp extends Application {
private NetComponent mNetComponent;
@Override
public void onCreate() {
super.onCreate();
// Dagger%COMPONENT_NAME%
mNetComponent = DaggerNetComponent.builder()
// list of modules that are part of this component need to be created here too
.appModule(new AppModule(this)) // This also corresponds to the name of your module: %component_name%Module
.netModule(new NetModule("https://api.github.com"))
.build();
// If a Dagger 2 component does not have any constructor arguments for any of its modules,
// then we can use .create() as a shortcut instead:
// mNetComponent = com.codepath.dagger.components.DaggerNetComponent.create();
}
public NetComponent getNetComponent() {
return mNetComponent;
}
}

如果不能没有Dagger component组件的引用, 你要确保重构项目(在AndroidStudio中, select Build > Rebuild Project)

因为我们覆写了默认的Application类, 我们同样修改应用程序nameMyApp, 这样, 你的应用程序将使用这个Applicaiton 类来处理最初的实例.

1
2
3
<application
android:allowBackup="true"
android:name=".MyApp">

在我们Activity的内部, 我们只需要调用inject()方法就可以简单的访问这些组件

1
2
3
4
5
6
7
8
9
public class MyActivity extends Activity {
@Inject OkHttpClient mOkHttpClient;
@Inject SharedPreferences sharedPreferences;
public void onCreate(Bundle savedInstance) {
// assign singleton instances to fields
// We need to cast to `MyApp` in order to get the right method
((MyApp) getApplication()).getNetComponent().inject(this);
}

限制类型

Qualified types

如果我们需要同一返回类型的两个不同对象, 我们可以使用@Named限定注解, 你需要在你提供单例的地方(@Provides annotation)和注入它们的地方(@Inject annotations)同时声明它们:

1
2
3
4
5
6
7
8
9
10
11
12
13
@Provides @Named("cached")
@Singleton
OkHttpClient provideOkHttpClient(Cache cache) {
OkHttpClient client = new OkHttpClient();
client.setCache(cache);
return client;
}
@Provides @Named("non_cached") @Singleton
OkHttpClient provideOkHttpClient() {
OkHttpClient client = new OkHttpClient();
return client;
}

当你注入这些单例的时候, 你同样需要@Named注解

1
2
@Inject @Named("cached") OkHttpClient client;
@Inject @Named("non_cached") OkHttpClient client2;

@Named是Dagger预先定义的限定注解, 你可以很好的创建你自己的限定注解
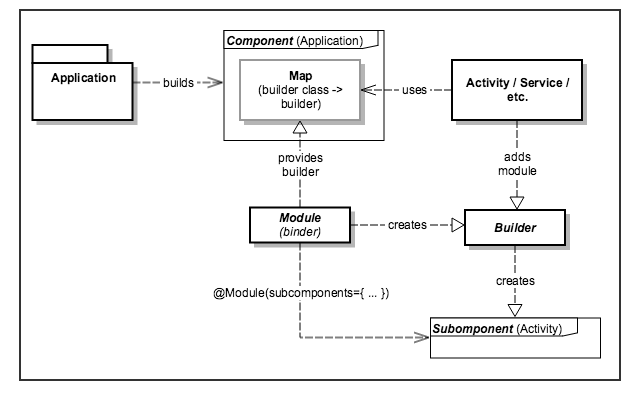
1
2
3
4
5
@Qualifier
@Documented
@Retention(RUNTIME)
public @interface DefaultPreferences {
}

作用域

Scopes

在Dagger2, 你可以声明Component组件通过声明自定义的范围如何封装. 举例来说, 你可以创建一个仅仅在activity或者fragment生命周期运行期间的作用域. 你可以创建只映射到用户身份验证会话的作用域.

利用作用域允许我们要么创建依赖组件要么创建子组件, 上面的例子表明我们所使用的@Singleton注解是伴随应用程序的整个生命周期, 我们同样依赖于一个主要的Dagger component组件.

如果我们希望拥有一个并不需要常驻内存中的多个Component组件(i.e. 依赖于activity或者fragment生命周期, 甚至依赖于用户的登录状态的Component组件), 我们可以创建相关的组件活着子组件, 在任何一种情况下, 都会为你封装代码提供一种方式. 我们将在下文中看到如何同时使用它们.

这里有使用这些方法的几点考虑:

  • 相关的组件要求父组件明确列出哪些依赖可以注入, 而子组件没有 对于父组件来说, 你需要通过指明类型和方法, 以想子组件暴露它们
1
2
3
4
5
6
7
8
9
10
11
12
// parent component
@Singleton
@Component(modules={AppModule.class, NetModule.class})
public interface NetComponent {
// remove injection methods if downstream modules will perform injection
// downstream components need these exposed
// the method name does not matter, only the return type
Retrofit retrofit();
OkHttpClient okHttpClient();
SharedPreferences sharedPreferences();
}

如果你忘记添加这行代码, 你将要看到一个关于注入目标丢失的错误. 类似于private/public变量如何去管理那样, 使用父component组件允许更明确的控制以及更好的封装, 但是使用子component组件使得依赖注入在花费的代价上更为简单

  • 两个相互依赖的组件不能共享同一范围. 举例来说, 两个组件不能同时使用 @Singleton注解 标注作用域, 这个限制是有这里描述的原因导致的, 相关的组件需要定义它们自己的范围.

依赖组件

Dependent Components

举例来说, 如果我们想要使用 用户会话的整个生命周期
我们可以声明我们自己的 @UserScope接口

1
2
3
4
5
6
import java.lang.annotation.Retention;
import javax.inject.Scope;
@Scope
public @interface UserScope {
}

然后, 我们声明它的父组件

1
2
3
4
5
6
7
@Singleton
@Component(modules={AppModule.class, NetModule.class})
public interface NetComponent {
// downstream components need these exposed with the return type
// method name does not really matter
Retrofit retrofit();
}

我们可以接着声明它的子组件

1
2
3
4
5
@UserScope // using the previously defined scope, note that @Singleton will not work
@Component(dependencies = NetComponent.class, modules = GitHubModule.class)
public interface GitHubComponent {
void inject(MainActivity activity);
}

我们假设下面的Github模块简单的返回一个Github Api的接口

1
2
3
4
5
6
7
8
9
10
11
12
13
14
@Module
public class GitHubModule {
public interface GitHubApiInterface {
@GET("/org/{orgName}/repos")
Call<ArrayList<Repository>> getRepository(@Path("orgName") String orgName);
}
@Provides
@UserScope // needs to be consistent with the component scope
public GitHubApiInterface providesGitHubInterface(Retrofit retrofit) {
return retrofit.create(GitHubApiInterface.class);
}
}

为了GitHubModule.java获得Retrofit实例的引用, 我们需要在调用它之前的组件中明确定义它们, 如果说在它之后执行注入, 它们应该在之后的组件中移除它们:

1
2
3
4
5
6
7
8
9
10
@Singleton
@Component(modules={AppModule.class, NetModule.class})
public interface NetComponent {
// remove injection methods if downstream modules will perform injection
// downstream components need these exposed
Retrofit retrofit();
OkHttpClient okHttpClient();
SharedPreferences sharedPreferences();
}

最后一步是使用GitHubComponent 执行实例化, 这个时候, 我们首先需要构建NetComponent, 并且在DaggerGitHubComponent builder的构造函数中传递它:

1
2
3
4
5
6
7
8
9
NetComponent mNetComponent = DaggerNetComponent.builder()
.appModule(new AppModule(this))
.netModule(new NetModule("https://api.github.com"))
.build();
GitHubComponent gitHubComponent = DaggerGitHubComponent.builder()
.netComponent(mNetComponent)
.gitHubModule(new GitHubModule())
.build();

this example code

子组件

Subcomponents

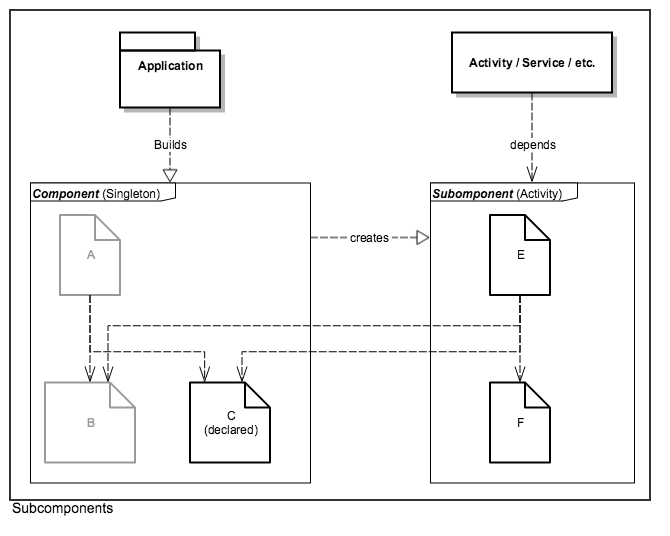
使用子组件是扩展组件的对象图的另外一种方式, 就像依赖的组件那样, 子组件有它们自己的生命周期并且当所有子组件的引用都消失的时候是可以被垃圾收集的, 并具有相同的范围限制。在使用这种方法的一个优点是,不需要定义所有下游组件.

另一个主要的不同之处就是子组件只需要在父组件中声明.

这里有一个为Activity使用子组件的例子. 我们使用自定义的范围和@Subcomponent注解标注一个类

1
2
3
4
5
@MyActivityScope
@Subcomponent(modules={ MyActivityModule.class })
public interface MyActivitySubComponent {
@Named("my_list") ArrayAdapter myListAdapter();
}

moudle模块使用下面声明

1
2
3
4
5
6
7
8
9
10
11
12
13
@Module
public class MyActivityModule {
private final MyActivity activity;
// must be instantiated with an activity
public MyActivityModule(MyActivity activity) { this.activity = activity; }
@Provides @MyActivityScope @Named("my_list")
public ArrayAdapter providesMyListAdapter() {
return new ArrayAdapter<String>(activity, android.R.layout.my_list);
}
...
}

最后, 在父组件中, 我们声明一个工厂方法

1
2
3
4
5
6
7
8
@Singleton
@Component(modules={ ... })
public interface MyApplicationComponent {
// injection targets here
// factory method to instantiate the subcomponent defined here (passing in the module instance)
MyActivitySubComponent newMyActivitySubcomponent(MyActivityModule activityModule);
}

在上面的例子中, newMyActivitySubcomponent()每次被调用的时候, 一个新的子组件的实例都会被创建, 使用子模块moudle注入到一个activity

1
2
3
4
5
6
7
8
@Singleton
@Component(modules={ ... })
public interface MyApplicationComponent {
// injection targets here
// factory method to instantiate the subcomponent defined here (passing in the module instance)
MyActivitySubComponent newMyActivitySubcomponent(MyActivityModule activityModule);
}

子组件创建

Available starting in v2.7